

Living in a villa in Dubai or any warm region offers comfort, space, and luxury. However, with bigger homes comes a greater need for proper cooling. When the summer heat becomes unbearable, having a well-installed air conditioning system makes all the difference. If you have ever wondered how villa AC installation works from start to finish, this detailed guide will walk you through each step in a simple and easy-to-understand way.
Note: Villa AC Installation in Dubai offers professional and reliable cooling solutions designed for large homes, ensuring even air distribution, energy efficiency, and lasting comfort throughout every room.
Understanding the Importance of Proper Villa AC Installation
A villa is not like a small apartment or office. It has larger spaces, higher ceilings, and sometimes multiple floors. Because of this, air conditioning systems for villas need to be carefully planned and installed to ensure every room receives the right amount of cooling.
When AC installation is done properly, it ensures:
-
Even cooling throughout the villa
-
Lower electricity bills due to efficient performance
-
Longer lifespan of your AC system
-
Fewer maintenance problems in the future
On the other hand, poor installation can lead to uneven cooling, frequent breakdowns, and wasted energy. That's why understanding each step of the installation process is so important.
Planning and Inspection Before Installation
Before any installation begins, a professional team usually visits your villa to perform an inspection. This step is crucial because it helps determine the type and capacity of air conditioning your home requires.
What the Inspection Includes:
-
Measuring the size of each room
-
Checking the number of windows and doors
-
Understanding the villa’s layout and structure
-
Identifying areas that receive more sunlight
-
Evaluating your electrical system
Based on these observations, experts can recommend the right type of AC system — whether it’s a split system, central ducted AC, or VRF (Variable Refrigerant Flow) system.
Choosing the right capacity is also important. An AC that is too small will struggle to cool the space, while one that is too large will waste energy and increase electricity costs.
Choosing the Right Type of AC System for Your Villa
Different villas have different cooling needs. Depending on your budget, villa size, and comfort preferences, you can choose from several AC systems.
Common AC Options for Villas:
-
Split AC System: Ideal for individual rooms. It includes an indoor and outdoor unit connected by refrigerant pipes.
-
Central Ducted AC System: Suitable for larger villas, it distributes cool air through ducts hidden in the walls or ceiling.
-
VRF/VRV Systems: A modern and energy-efficient option for villas with multiple rooms. These systems adjust cooling automatically according to temperature needs.
-
Package AC Units: Often used in villas with limited indoor space, they combine all parts in one compact outdoor unit.
Your installer will guide you in choosing the system that matches your villa’s cooling requirements and energy efficiency goals.
Designing the Layout and Duct Planning
Once the type of AC is decided, the next step is to design the duct layout (for ducted systems) or plan the placement of indoor and outdoor units (for split systems). This design phase ensures that every part of your villa receives balanced cooling.
Key Factors Considered in Layout Planning:
-
Position of air vents for smooth airflow
-
Shortest and most efficient route for ducts or pipes
-
Location of indoor and outdoor units for easy maintenance
-
Avoiding areas with excessive heat exposure
A well-designed layout ensures your AC system works quietly and efficiently without disturbing your villa’s interior design or comfort.
Preparing the Installation Site
Before technicians begin installation, the villa needs to be prepared. This step ensures safety, convenience, and efficiency.
Preparation Steps Include:
-
Clearing space where indoor and outdoor units will be installed
-
Making sure electrical connections are easily accessible
-
Ensuring ceilings and walls are ready for duct installation
-
Checking that the outdoor area has proper ventilation
The installation team also takes care to protect your furniture and flooring during this process to avoid dust or damage.
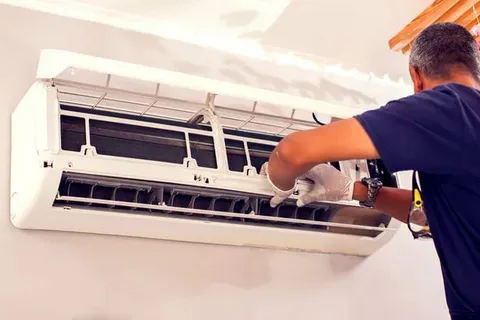
Installing the Indoor Unit
The indoor unit is the part of your AC that blows cool air into your rooms. It’s usually mounted on a wall, ceiling, or hidden behind panels in ducted systems.
Installation Process of the Indoor Unit:
-
The technician mounts the unit securely on the wall or ceiling.
-
Holes are made for connecting refrigerant pipes and drain hoses.
-
Electrical wiring is carefully connected to the main power line.
-
The drain hose is positioned correctly to allow condensed water to flow out easily.
A properly installed indoor unit ensures quiet operation and efficient cooling in every part of your villa.
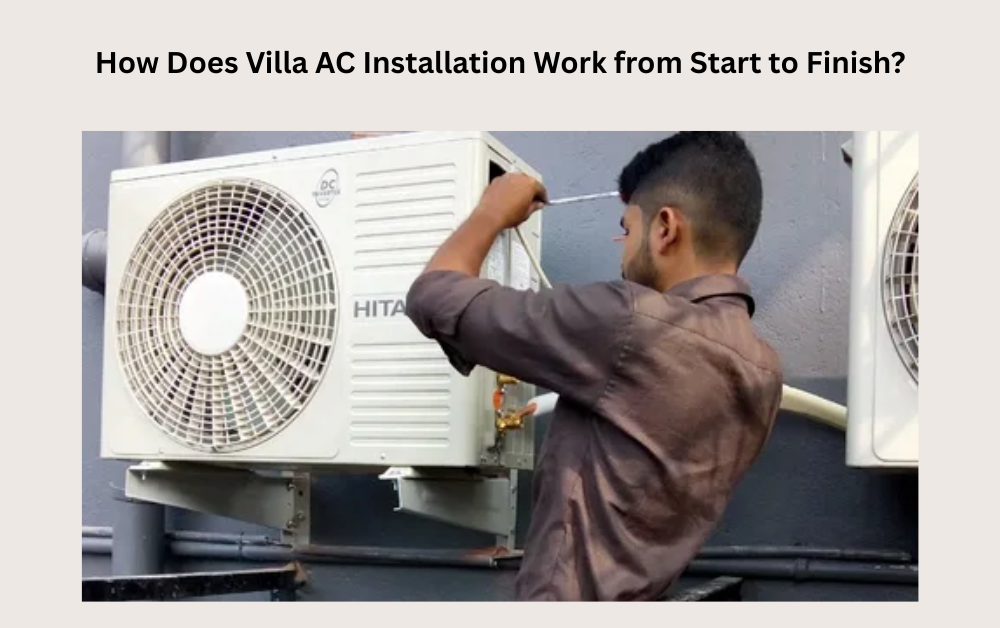
Installing the Outdoor Unit
The outdoor unit is responsible for releasing the heat absorbed from inside your villa. It includes the compressor, condenser, and fan. This unit should be installed in a well-ventilated area to work effectively.
Steps for Outdoor Unit Installation:
-
Technicians place the outdoor unit on a flat and stable surface, often using brackets or concrete stands.
-
They ensure proper spacing around the unit for ventilation.
-
The unit is connected to the indoor system through copper refrigerant pipes and wires.
-
The outdoor area is checked for drainage and airflow.
Proper installation of the outdoor unit is key to long-lasting AC performance and reduced maintenance issues.
Connecting Refrigerant Lines and Electrical Wiring
Once both the indoor and outdoor units are fixed, the next step is to connect them using refrigerant lines and electrical wiring. This step needs precision because even a small mistake can affect your AC’s cooling efficiency.
What This Step Includes:
-
Connecting copper pipes that carry refrigerant gas
-
Securing electrical cables for communication and power
-
Wrapping all connections to prevent leaks and protect from heat
-
Checking insulation around the pipes to avoid energy loss
After the connection is complete, technicians perform a vacuum test to make sure there are no leaks in the system.
Installing and Sealing the Ducts (For Ducted Systems)
If your villa uses a ducted AC system, this step is one of the most important parts of the process. Ducts are installed throughout the ceiling or walls to distribute cool air evenly.
Duct Installation Process:
-
Ducts are carefully measured and cut according to the layout plan.
-
Each section is sealed properly to prevent air leakage.
-
Air vents are installed in each room for balanced airflow.
-
Insulation is applied to ducts to maintain temperature and reduce noise.
Well-installed ducts ensure every room in your villa remains cool and comfortable without wasting energy.
Testing and Commissioning the AC System
After everything is connected and secured, the technicians will test the system to make sure it’s working correctly. This step ensures that your AC performs as expected before it’s handed over to you.
Testing Includes:
-
Checking the airflow in each room
-
Measuring temperature and cooling speed
-
Ensuring there are no gas leaks or wiring faults
-
Testing the thermostat and control settings
-
Confirming that noise levels are minimal
Once all tests are successful, the system is ready for use.
Cleaning Up and Final Inspection
After installation and testing, the team will clean up the work area and remove any debris or packing materials. They will also give you a final walkthrough of the system.
During the Final Inspection:
-
The installer explains how to operate the AC system.
-
You are shown how to adjust temperature and modes.
-
Basic maintenance tips are shared.
-
Warranty and service details are provided.
This final step ensures you feel confident about using your new air conditioning system.
Maintenance Tips After Villa AC Installation
Proper maintenance helps keep your AC running efficiently for years. Ignoring it can lead to breakdowns, high electricity bills, and poor cooling performance.
Simple Maintenance Tips:
-
Clean or replace air filters every few weeks.
-
Keep the outdoor unit area clean and free from dust or plants.
-
Schedule professional servicing every 6 to 12 months.
-
Check ducts for any leaks or blockages.
-
Monitor your electricity usage for unusual increases.
Following these steps ensures your AC continues to deliver smooth, reliable cooling all year round.
Common Mistakes to Avoid During Villa AC Installation
Many homeowners unknowingly make small mistakes that reduce the efficiency of their AC systems. Avoiding these can save you money and trouble later.
Mistakes to Avoid:
-
Choosing the wrong AC capacity for your villa size.
-
Installing units in direct sunlight or near heat sources.
-
Using untrained technicians for installation.
-
Ignoring insulation around ducts and refrigerant lines.
-
Do not check for air leaks during setup.
Being careful with these details ensures you get the best performance from your air conditioning system.
Energy Efficiency Tips for Your Villa AC
After installation, there are simple things you can do to save energy while keeping your villa cool.
Helpful Tips:
-
Set the thermostat to a comfortable temperature (around 24°C).
-
Close windows and doors while the AC is running.
-
Use curtains or blinds to block direct sunlight.
-
Turn off AC units in rooms not in use.
-
Schedule regular maintenance for better efficiency.
Small efforts like these make a big difference in long-term performance and energy savings.
Conclusion
Installing an air conditioning system in a villa is not just about placing units and turning them on. It's a detailed process that requires planning, technical skill, and precision. From the first inspection to the final testing, every step plays a vital role in how well your AC will perform.
When done correctly by professionals, villa AC installation ensures maximum comfort, lower energy costs, and a longer lifespan for your system. Whether you live in Dubai or any other warm region, having the right AC setup keeps your villa cool, refreshing, and enjoyable throughout the year.
A well-installed AC is not just a luxury—it's an investment in your comfort and peace of mind.
For more insightful articles related to this topic, feel free to visit : turkhand.org